Paper Quilling is an art form which has been attracting craft lovers all over the world and from all ages. There's so much to learn in it that I find myself searching the net every other day to learn new techniques. Today I want to share with you all an easy step by step tutorial for making Tight Quilled Coils. These tight quilled coils are used in almost all basic quilling designs. Here I have made use of them for making a Tight Quilled Coil Snail Fridge Magnet.


Step by step tutorial for making tight quilled coils
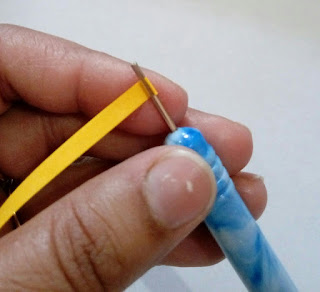
1. For making a tight quilled coil start by putting one end of your quilling strip in the slotted tool.

2. Carefully start rotating the slotted tool keeping the coil between your thumb and index finger. To get a flat coil you have support the coil from one side with your middle finger.
3. Once you get about half a centimeter of coil ready, put a little glue to the strip and start rotating again. This will ensure that your coil does'nt become loose even if you accidentally loose hold of the coil.


4. When you get the coil of desired diameter glue its free end and take out from the tool. Keep on a flat surface and tap to get an evan surface.
5. Apply a little glue to one surface, evenly spread it and let it dry. Now the coil is hard enough to be used.


Hope you liked the tutorial. Though it might sound very basic but I have posted it hoping that it might be of help for beginners. Do post your comments if you have something to share.